Chapter 1Getting started
CurryCaster II is a whole show desk in one app: your microphone, eight players for clips, a cart wall, your show outline, guests from anywhere, recording, streaming and an editor. This manual shows every part of it.
Install
- Mac: unzip the download and drag CurryCaster II into your Applications folder, then open it. If your Mac says “CurryCaster II” Not Opened, click Done, open System Settings → Privacy & Security, and click Open Anyway beside “CurryCaster II” was blocked. You do this only once.
- Windows: run the installer. If Windows says Windows protected your PC, click More info, then Run anyway. It installs for you only, with a Start menu entry and a desktop icon.
- Linux: make the AppImage executable and run it.
The website's download page shows every step with pictures.
What you need
- Mac: Apple Silicon (M1 and newer), macOS 13 Ventura or newer.
- Windows: Windows 10 or 11, 64-bit.
- Linux: a 64-bit PC (x86_64), for example Ubuntu 20.04 or newer.
- All: 4 GB of memory (8 GB is better), 1 GB of free disk space, a microphone or a USB mixer, and an internet connection for guests. Headphones are best when you have guests.
The first start
The desk starts by itself when the app opens. There is no start button to press.
The first time, your computer asks if CurryCaster II may use the microphone. Click Allow. Without it the desk cannot hear you, and the computer hides the names of your audio devices.
CurryCaster II also makes an Example Show for you, so you can try everything at once. You find it in your home folder, under StudioCast/Example Show. It has:
- a User Guide outline, open in the Show outline,
- seven sound effects, already on the cart wall,
- your own guest room, ready to open (with a guest-room subscription).
Read this first: how you hear yourself
In ONE MIC mode, CurryCaster II puts the clips, the carts and the guests in your headphones. Your own voice is not there: Hear my voice is Off. A computer always adds a small delay, and your own voice, late in your ears, makes it hard to talk.
So your headphones must get your voice from the hardware, with no delay:
- A USB microphone with a headphone jack (the usual case): plug your headphones into the microphone. In CurryCaster II, choose that microphone as Microphone and also as Headphones. You hear yourself directly, and the clips and the guests come out of the same jack.
- An XLR microphone: use an audio interface with direct monitoring. Plug the microphone and your headphones into the interface, and turn on its direct monitoring (a switch or a knob). In CurryCaster II, choose the interface as Microphone and also as Headphones.
- A mixer (for example a RØDECaster): use MIXER mode, not ONE MIC. The mixer gives you your voice and mixes the show. See Sound.
Headphones in the computer, and a microphone with no headphone jack? Then you do not hear yourself. You can set Hear my voice to Unprocessed, but your voice is a little late.
The desk at a glance
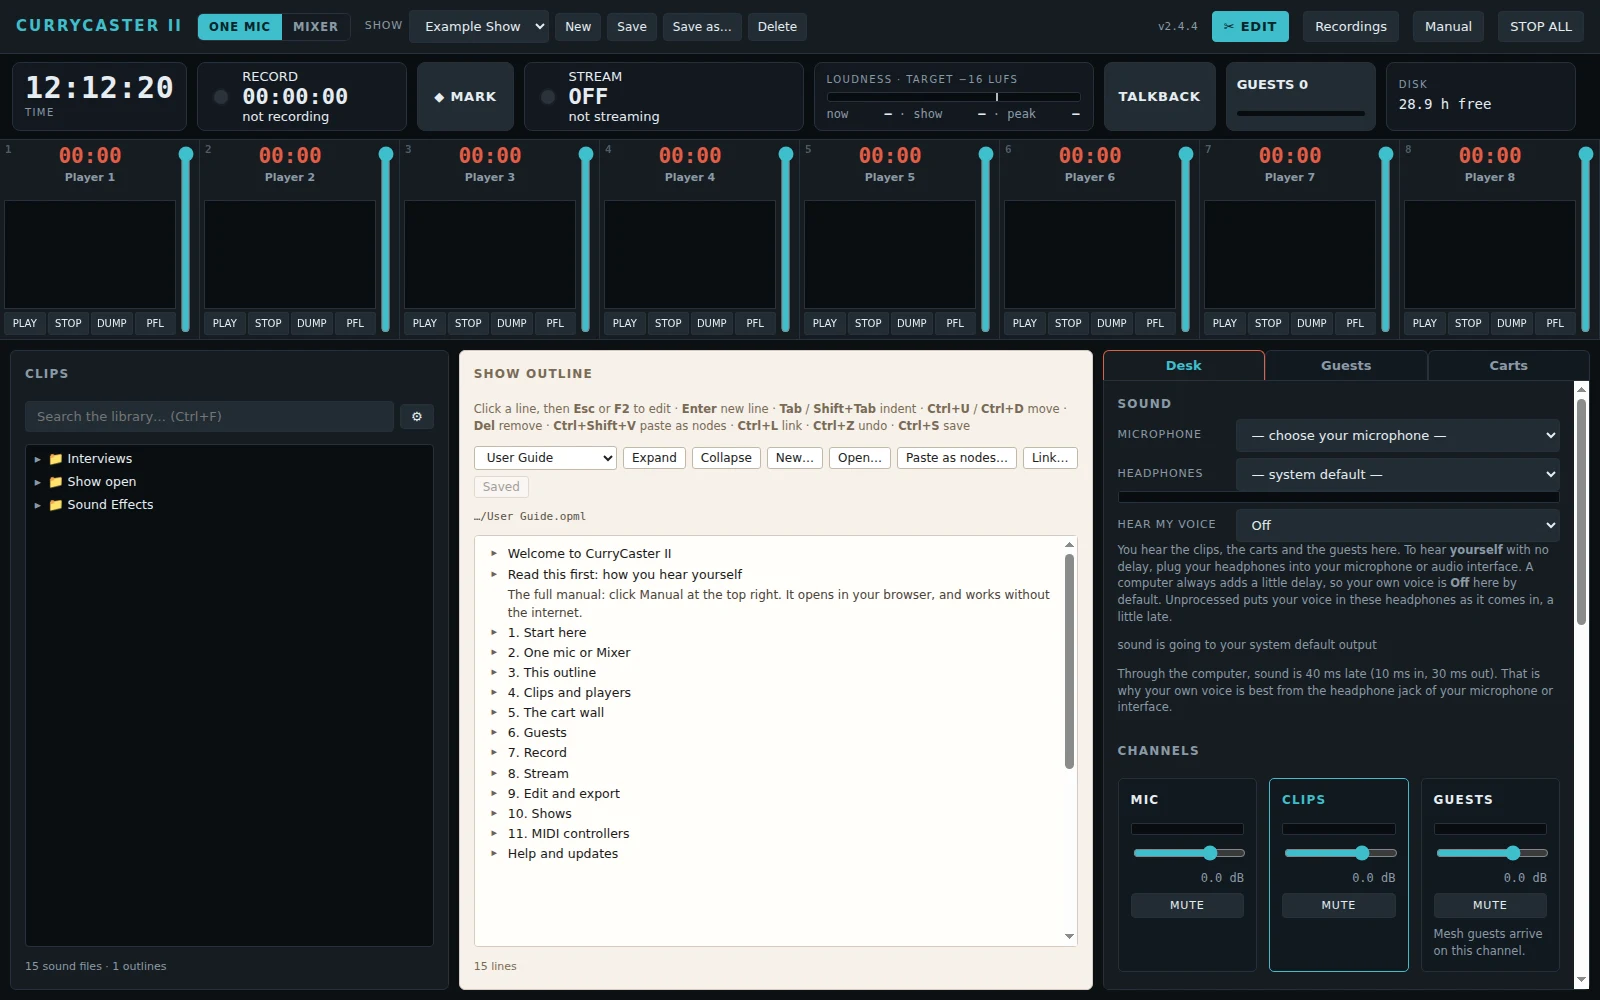
From top to bottom:
- The top bar: the name, ONE MIC or MIXER, the show, and the buttons for the editor, your recordings and STOP ALL. See Shows.
- The on-air bar: the clock, RECORD, MARK, STREAM, loudness, TALKBACK, guests and disk space. See The on-air bar.
- Eight players for your clips. See Players.
- Clips (left): the files of your show. See The clip browser.
- Show outline (middle): your running order and notes. See The show outline.
- Desk, Guests, Carts (right): three tabs. See Sound, Guests and The cart wall.
Five minutes to your first sound
- On the Desk tab, under Sound, choose your Microphone and your Headphones.
- Talk. The meter on the MIC channel moves.
- In Clips, click a sound file. It loads into the next free player.
- Press PLAY on that player.
- Open the Carts tab and click Ding.
- Press Save in the top bar, so the show keeps your choices.